Preamble
- This User Guide documents the NESPript Web server developed by Patrice GOUET and Xavier ROBERT
 in the "Retroviruses and Structural Biochemistry " research team of the "MMSB " laboratory (UMR5086 CNRS / University Lyon 1 ). in the "Retroviruses and Structural Biochemistry " research team of the "MMSB " laboratory (UMR5086 CNRS / University Lyon 1 ).
- NESPript, 'Nucleic acids Easy Sequencing in PostScript', is a web tool designed for the representation of multiple alignments of nucleic acid sequences, including the visualization of their secondary structures in Dot-Bracket Notation (DBN) when available.
- Its main input is a file of pre-aligned sequences in Clustal, FASTA or MultAlin formats. The program calculates a similarity score for each residue in the sequences, coloring the alignment accordingly. Secondary structure elements in DBN can be added to the multiple sequence alignment using PDB, CIF or DSSR files. Finally, NESPript outputs a PostScript / PDF / PNG or TIFF file of aligned sequences with graphical enhancements.
The NESPript interface consists of:
- A BUTTONS frame, fixed at the top of the page.
- A MAIN frame, which contains the user form.
- A POP-UP window containing the results of your NESPript job.

- Only yellow buttons are active, with the exception of the TIME bar. Blue buttons are not clickable.
- When the main form is filled in, click on the SUBMIT button to let NESPript process your query.
- A result pop-up window will automatically appear within seconds. This results window can be (re-)opened at any time by clicking on the RESULTS button.
-
- In order to access the results, you may need to authorize your browser to display pop-up windows from
nespript.ibcp.fr.
If necessary, consult your browser documentation or see our F.A.Q. section (second paragraph).
- The DOC button displays this User Guide in a separate window.
- Click on ADV (ADVanced) or EXP (EXPert) to have access to more options. The default mode is BEG (BEGinner).
- In ADV mode, you can import another secondary structure file, change secondary elements labels and tinker with special characters.
- In EXP mode, you can also define your own colors, shift sequence numbering, etc.
- You can navigate between BEG , ADV and EXP modes without losing any information in your query.
- If you are in ADV or EXP mode, you can use the +1 button to build a layered NESPript figure. When you click on +1 , a new layer is created (up to 20 layers can be defined). The parameters set for Layer 0 (i.e. the first Layer) are copied to Layer 1 (and so on). Button -1 allows the user to suppress the last layer created. Layer Common contains parameters that are common to all layers.
- You can switch between the different layers by clicking on the tab bar (see figure below). Refer to our Tutorial & Examples page to learn more about this option.

- Use the SAVE button to save your session to your computer, so that you can use the same parameters and files later.
- Use the LOAD button to load a previously saved session.
- Pay attention to the TIME bar. You must execute at least one command every 60 minutes otherwise your session will be closed.
- Before leaving, click on the EXIT button to permanently remove the processing and result files from the server.
The RESULTS pop-up window
- This multi-tab window displays the output files produced by NESPript, along with dedicated links to PDF files (as well as TIFF and PNG files if requested). Left-click to visualise them, or right-click to retrieve them.
- Curious users can click on the Server logs Input files or Tracing files tabs to access the corresponding reports and data.

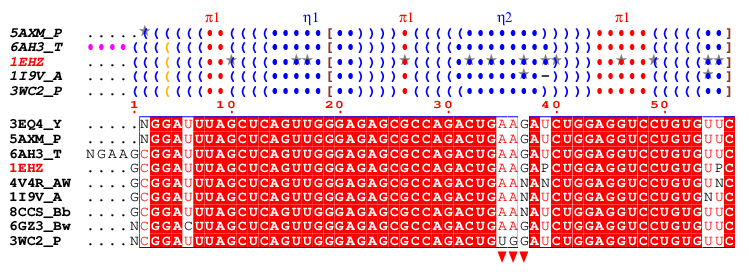
- A typical figure produced by NESPript is shown below. It was generated from the alignment file clustal-1EHZ.aln which contains tRNAPhe sequences. For more details on this example, please refer to Example #2 on our Tutorials & Examples page.
- The secondary structure elements are displayed above the sequence block in DBN format (see ViennaRNA documentation and DSSR colouring in this documentation). Grey stars (★) indicate modified bases located on secondary structure elements. These modifications are derived from PDB files using X3DNA-DSSR .
- Below the DBN block is the multiple sequence alignment, where the default colouring is based on the percentage of strict identity for each residue column (see this chapter).
- Finally, users can add custom markers as desired (see this chapter). In this example, three red triangles have been placed below the sequence block to indicate the position of the anticodon within the tRNAPhe sequences.
- Fill up the form by uploading at least one multiple alignment file in the Aligned Sequences section of the form.
- PDB, CIF or DSSR files can be uploaded in the Secondary structure depiction section.
- The rest of the form allows you to change parameters related to the secondary structures and sequence similarity depiction, as well as the layout of the alignment output or the size and format of the resulting figures (in PostScript, PDF, PNG, TIFF format).
- All these options are explained in detail in this User Guide, accesible from the interface by clicking on the
 icon. icon.
- Tooltips are also available for form elements by moving the cursor over an
 Answer to the Ultimate Question of Life, the Universe, and Everything Answer to the Ultimate Question of Life, the Universe, and Everything

Default: 42 icon.
We will now detail, section by section, all the options available in the NESPript form.
Throughout the rest of this user guide, options that are available in BEGinner, ADVanced and EXPert modes will be indicated by the BEG , ADV and EXP icons, respectively.
"Aligned Sequences" section
- Sequence type BEG ADV EXP
Here, you can select how NESPript will process the sequences in the multiple alignment. If the RNA option is enabled, thymines (T) are changed to uracils (U).
Default: RNA
- ALN file BEG ADV EXP
Upload your query file here. Typically, this should be a multiple sequence alignment in one of the following supported formats: Clustal, FASTA, MultAlin or NPS@.
Alternatively, you may upload a PDB or CIF file as input, provided it contains one or more nucleic acid chains. The sequence corresponding to the specified Chain ID (see the Chain ID (PDB/CIF file) option below) will be automatically extracted and displayed, with the secondary structure elements shown above it in DBN (Dot-Bracket Notation) format.
- Range ADV EXP
This option defines the range of residues that will be displayed.
Default: all → whole sequence.
Example 5-50 → displays residues 5 to 50.
- Start ADV EXP
The residues are renumbered so that the first displayed sequence starts with the given number.
- Chain ID (PDB/CIF file) ADV EXP
If your PDB/CIF query file contains multiple chains, you can select here the one you want to work with.
Remark Double-character chain IDs are currently not supported.
Accepted values: A to Z, a to z and 0 to 9 (depending on the existing chains in the query PDB/CIF file).
- Hide sequences ADV EXP
This option can be used to create a figure containing several secondary structure elements using layers (see the Tutorial page, example #3 ). If this option is selected, the aligned sequences will not be displayed and only secondary structure elements are written, if available.
Default: unchecked
- Number sequence BEG ADV EXP
By default, the first sequence is numbered every ten residues. With this option selected, however, all sequences are numbered at the beginning of each block.
Default: unchecked
- Keep the gaps in alignment EXP
If this option is selected, the columns of the multiple sequence alignment that contain only gaps will be retained. This option is particularly useful if you choose to display only some of the sequences in your multiple alignment using the Defining groups section of the form. This can result in columns containing only gaps being discarded by default. Enabling this option preserves these 'full-gap' columns.
Default: unchecked
- Keep lowercase residues EXP
If this option is selected, lowercase characters in the sequence alignment will not be converted to uppercase.
Default: unchecked
- Extract reference sequence EXP
Extract the reference sequence used for numbering (the first sequence by default, which can be reassigned using the Y command in the Special commands and characters section). This sequence can be downloaded from the Tracing Files tab in the RESULTS pop-up window.
Default: unchecked
- Insert in seq numbering EXP
Residue numbering can be changed within a single sequence. With this option, residue numbering is shifted by +1 in the selected column. Before using this option, enable the Ruler option (described below) to visualise the column numbers.
Note that the sequence numbering refers to the first displayed sequence by default but, for example, can refer to the third sequence if you enter Y D 3 in the Special commands and characters section (see below).
Example 10 55 → the residue numbering is shifted by +1 at columns 10 and 55.
- Delete in seq numbering EXP
Residue numbering can be changed within a single sequence. With this option, residue numbering is shifted by -1 in the selected column. Before using this option, enable the Ruler option (described below) to visualise the column numbers.
Note that the sequence numbering refers to the first displayed sequence by default but, for example, can refer to the third sequence if you enter Y D 3 in the Special commands and characters section (see below).
Example 10 55 → the residue numbering is shifted by -1 at columns 10 and 55.
- Ruler EXP
The column numbers are displayed if checked. This option is useful when preparing a figure with the Insert in seq numbering or Delete in seq numbering options, or when using the special characters Q, V and W (see the Tutorial page, example #3 ).
Default: unchecked
"Secondary structure depiction" section
- Top secondary structures / Input file BEG ADV EXP
You can upload a file in PDB, CIF or DSSR format here to add structural information, which will be presented above the sequence block.
IMPORTANT Please ensure that the sequence in the uploaded file matches the sequence at the top of the alignment.
- Top secondary structures / Chain ID BEG ADV EXP
By default, secondary elements are extracted from the first monomer (i.e. first chain ID) of the uploaded PDB/CIF file and displayed. You can specify a different chain here instead.
Accepted values: A to Z, a to z and 0 to 9 (depending on the existing chains in the query PDB/CIF file).
- Depict all known structures BEG ADV EXP
Checking this box instructs NESPript to search the PDB database for entries with the same name as the aligned sequences. This enables secondary structure information to be displayed for any aligned sequence with a known 3D structure.
Default: unchecked
- Depict all known structures except low-resolution ones ADV EXP
Checking this box instructs NESPript to search the PDB database for entries with the same name as the aligned sequences. This enables secondary structure information to be displayed for any aligned sequence with a known 3D structure. When this option is selected, structures with only phosphorus traces (P-traces) available are not displayed.
Default: unchecked
- Bottom secondary structures / Input file ADV EXP
You can upload a file in PDB, CIF or DSSR format here to add structural information, which will be presented below the sequence block.
IMPORTANT Please ensure that the sequence in the uploaded file matches the sequence at the bottom of the alignment.
- Bottom secondary structures / Chain ID ADV EXP
By default, secondary elements are extracted from the first monomer (i.e. first chain ID) of the uploaded PDB/CIF file and displayed. You can specify a different chain here instead.
Accepted values: A to Z, a to z and 0 to 9 (depending on the existing chains in the query PDB/CIF file).
Parameters
- Sec. structure labels BEG ADV EXP
You can choose to have the label names incremented by consecutive numbers (option "α1,β1,α2,β2,…") or letters (option "αA,βA,αB,βB,…").
Default: α1,β1,α2,β2,…
- DSSR colouring BEG ADV EXP
If checked, the secondary structure elements in DBN are coloured and labeled as follows: blue () indicate regular base pairs, orange () are wobble pairs; maroon <>, {}, [] are pseudo-knots; blue dots, labeled η, indicate hairpin loops; cyan dots, labeled β, indicate bulges; green dots, labeled ι, indicate internal loops; red dots, labeled π, indicate junctions; purple dots, labelled α, indicate non-loop single stranded segments.
Default: checked
- Hide labels ADV EXP
Checking this box removes the labels for the upper secondary structure.
Default: unchecked
- Hide names ADV EXP
Checking this box removes the name of the sequence from the start of each secondary structure element line.
Default: unchecked
- Hide modified bases ADV EXP
NESPript uses grey stars ★ to highlight modified bases on secondary structure elements in DBN. If this option is selected, the stars will no longer be displayed.
Default: unchecked
"Sequence similarities depiction parameters" section
- Global score BEG ADV EXP
NESPript calculates the percentage of strict identity for each residue column. The global score defines the threshold that distinguishes between low and high similarity. If the similarity score of a residue column exceeds this threshold, the residues are displayed in red with a blue frame. Columns with scores below the threshold are displayed in black. Regardless of the threshold value, residues with strict identity are always represented as white on a red background.
Accepted values: 0 to 1 Default: 0.7
- Display consensus seq. BEG ADV EXP
Ticking this box will add the consensus sequence to the alignment figure.
Default: unchecked
"Special commands and characters" section ADV EXP
This section of the form allows you to modify characters or boxes and their colors, as well as add user-spplied markers.
- Add or modify characters and boxes ADV EXP
Entry on each line is: Character-Type Colour Position(s)
Example U R 2 9-39 adds red (R) triangles (U) at residue 2 and at residues 9 to 39 (2 9-39)
Character-Type
|
|
Title
|
T |
changes colour of sequence names |
|
Assignment
|
X |
top secondary structure information is assigned to a chosen sequence, which is the first one by default. Colour of secondary elements can be changed. |
Y |
sequence numbering is assigned to a chosen sequence, which is the first one by default. Colour of digits can be changed. |
Z |
residue numbering of another sequence, which is the last one by default, can be displayed at the bottom of sequences blocks. Secondary structure information corresponding to this sequence can also be displayed. |
|
Do it yourself
|
Q |
boxes residues |
V |
bold characters |
W |
adds frames |
|
Changing default colours of
|
A |
labels above top secondary structure elements |
I |
identity boxes |
F |
identity characters |
M |
group similarity boxes |
H |
group similarity characters |
B |
global similarity frames |
O |
difference similarity boxes |
N |
low similarity scores |
|
Adding markers
|
U |
▲ triangle up |
D |
▼ triangle down |
G |
▶ right-pointing triangle |
J |
◀ left-pointing triangle |
S |
★ star |
C |
● solid circle |
E |
○ open circle |
L |
… dotted line |
K |
■ square |
|
Adding NMR markers
|
s |
amide proton slow exchange rate (< 1mn-1) |
t |
3JHN,Hα NH-Hα coupling constant < 6 Hz |
u |
3JHN,Hα NH-Hα coupling constant ≥ 7 Hz |
a, b, c |
dNN(i,i+1) NOE between proton NH of residue i and i+1 (weak, medium, strong) |
d, e, f |
dαN(i,i+1) NOE between proton α of residue i and proton NH of i+1 (weak, medium, strong) |
g, h, i |
dβN(i,i+1) NOE between proton β of residue i and proton NH of i+1 (weak, medium, strong) |
j |
dNN(i,i+2) NOE between proton NH of residue i and proton NH of i+2 |
k |
dαN(i,i+2) NOE between proton α of residue i and proton NH of i+2 |
l |
dαN(i,i+3) NOE between proton α of residue i and proton NH of i+3 |
m |
dαβ(i,i+3) NOE between proton α of residue i and proton β of i+3 |
n |
dαN(i,i+4) NOE between proton α of residue i and proton NH of i+4 |
Character-Colour
(except if R is Character-Type)
|
D
Black |
B
Blue |
R
Red |
P
Pink |
G
Green |
F
Green fluo |
C
Cyan |
O
Orange |
Y
Yellow |
M
Maroon |
W
White |
S
Transparent |
Position(s)
By default, residues are numbered according to the first displayed sequence
[ ] means mandatory and { } optional
|
| 1 |
if Character-Type= T
[sequence name number or range] {other sequence name number or range} {...}
|
Example T G 2 → colours the name of the second sequence in green.
|
| 2 |
if Character-Type= X, Y, Z
[name or number of sequence displayed] {Start-Index (1 by default)}
or
[residue range] {other residue range} {...}
|
Example X B 3 → assigns the first secondary structure file to the third displayed sequence (sec. structure elements are in blue).
Example Z B 4 → numbers the fourth displayed sequence in blue.
(the same command Z B 4 can be used to assign the second sec. structure file to the fourth displayed sequence and to colour sec. structure elements in blue).
Example to colour elements in blue and red:
X B 3 (secondary structure elements refer to the third displayed sequence and are in blue. This sequence is now the reference)
X R 4-50 60-80 (but secondary structure elements from residues 4 to 50 and from 60 to 80 are in red)
Remark you can type X B name_of_the_third_displayed_sequence instead of X B 3
|
| 3 |
if Character-Type= Q, V, W
[number or range of sequence displayed] {column range} {other column range} {...}
|
IMPORTANT Here, column numbering is used instead of residue numbering. Check the option Ruler (see below) to preview column numbers.
Example Q Y 3-8 40-45 50-55 → highlights in yellow residues of sequences 3-8 from columns 40 to 45 and from columns 50 to 55.
Example Q C 1000 → highlights the last sequence in cyan.
|
| 4 |
if Character-Type= U, D, S, C, L, A, I, F, M, H, B, O, N, s, t, u, a, b, c, d, e, f, g, h, i, j, k, l, m, n
[residue number or range] {other residue number or range} {...}
|
Example U R 2 9-39 → adds red triangles at residue 2 and at residues 9 to 39.
Example I B 1-6000 → boxes all identical residues in blue.
Example A S 1-6000 → removes all secondary structure labels.
Remark By default, positions refer to residue numbering of the first displayed sequence. Use the special command Y to change this default:
Y B 3 (residue numbering refers to the third displayed sequence and residues numbering is in blue)
U R 9 20-30 (adds red triangles below columns containing residues 9 and 20 to 30 of sequence 3)
|
- Ruler ADV EXP
Show the column numbers in the alignment. This option is useful when creating a figure using the above option.
Default: unchecked
- Colour by residues chemical properties ADV EXP
If checked, purine residues (A, G) are written in white on a red background if strictly conserved. They are written in red on a grey background if >70% similarities (by default) and on a white background otherwise. The same scheme applies to pyrimidine residues (C, T, U), substituting red with blue. Remaining characters are in black.
Default: unchecked
- Redefine or create colours EXP
Assigns a new RGB code for a special character colour.
Syntax letter r g b
with letter = any capital letter and [r g b] = three numbers between 0.0 and 1.0 corresponding to the red, green and blue component values, respectively (see the RGB Color Picker site to quickly obtain these values).
Example R 0.8 0.2 0.3 A 0.5 0.8 0.7
- Insert some text at chosen sequences EXP
This Inserts a text above the chosen sequence. Note that sequences are numbered from top to bottom, starting at 1.
Syntax sequence_name text
Syntax number text
Example U49845 Here is my first sequence
Example 2 Here is my second sequence
- Replace secondary structures labels ADV EXP
It replaces the secondary structure labels with new ones. Replacement is made according to the order of entry: first through the top secondary structure elements and then, if applicable, through the bottom elements.
Syntax Sec.Struct.CodeNewLabel
Sec.Struct.Code: h, b, i, p, a refer to hairpin loops, bulges, internal loops, junctions and non-loop single-stranded segments, respectively. These first characters are not displayed. If Sec.Struct.Code is entered in uppercase, the second letter is displayed in a Symbol font.
IMPORTANT The Sec.Struct.Code and NewLabel are attached.
Example hH0 → replaces the first hairpin-loop label with H0.
Example BB1 BB2 BB3 → replaces the first three bulge labels with β1, β2 and β3, respectively.
Example a a → removes labels from the first two non-loop single-stranded segments.
- Replace sequence names EXP
This replaces the name of a sequence contained in your alignment with a new one. You can substitute up to 15 names.
Syntax oldname1 newname1 oldname2 newname2
Example U49845 MYDNA
"Defining groups" section BEG ADV EXP
- You can select the sequences to be displayed and their order.
Default: all
Example 1-3 6-10 → removes sequences 4 and 5 from a 10 sequences alignment.
Example 1 3 2 4 5 → swaps the order of sequences 2 and 3 from a 5 sequences alignment.
Example 2 all → display sequence 2 first, then all the others.
"Alignments output layout" section BEG ADV EXP
The following options control the layout of the NESPript figure.
-
Colour scheme
- Normal: standard colour scheme.
- Flashy: uses flashy colours. Similar residues are written in black bold characters and boxed in yellow.
- Thermal: coloured with all letters in bold.
- Slide: light cyan background.
- B&W: a grey scale is used.
- Orientation
Render the figure in either portrait or landscape orientation.
Default: Portrait
- Paper size
A4, A3, A0, US Letter or Tapestry (width: 0.8 m x height: 3.3 m).
Default: A4
- Footnotes
Add a short note to the bottom of the final alignment page.
- Font size
Font size in points (the 'Courier' monospaced font is used for sequence names and residues).
Accepted values: 5 to 60 Default: 6
- Number of columns
The number of residue columns per row in the sequence representation.
Accepted values: 1 to 150 Default: 60
- Gap between blocks
The vertical gap between two blocks of sequences. The unit of measurement is the height of a line.
Accepted values: 0 to 200 Default: 7
- Horizontal shift
Horizontal shift for the entire display. The unit of measurement is the width of a residue.
Accepted values: 0 to 200 Default: 0
- Vertical shift
Vertical shift for the entire display. The unit of measurement is the height of a line.
Accepted values: 0 to 200 Default: 0
- Bottom shift
Shift the lines below the bottom sequence. The unit of measurement is the width of a residue.
Accepted values: 0 to 200 Default: 0
"Alignments output files" section BEG ADV EXP
- You can render and export your NESPript figure in a variety of file formats, including PostScript, PDF, PNG and TIFF.
PDF is recommended for viewing purposes, while PNG and TIFF are recommended for publication.
- Please note that rendering PNG or TIFF images may take some time, especially when using the 300 or 600 dpi options. Therefore, high dpi formats (>150 dpi) are only recommended for publication-quality images.
User guide last revision: November 18, 2025
|